Showing posts with label Chocolate. Show all posts

Sunday, 12 November 2017

Sticky Gooey Chocolate Marshmallow Sandwiches - Smores(ish)


After a recent trip to Scotland where I introduced the boys to the joy of toasting marshmallows over a fire, we've been using more at home.
L, whose never been bothered by his allergies before, came home from Cubs a bit upset as they'd made Smores one evening. Had they told me in advance I would have sent in safe biscuits, chocolate and marshmallows so he could be included, but when he'd joined a few weeks earlier, they told me they don't do a snack while the boys are there. I've asked them to let me know when there are exceptions again!

Having just come home to an empty biscuit tin after a chilly winter walk, I thought I'd try our own variation...
Cinnamon Cookies (You could skip this step and use any suitable biscuits, I would have used Free From digestives but have run out)

100g Dairy and Soya Free Spread
100g Soft Brown Sugar
1tbsp Golden Syrup
1tsp Vanilla Paste (or extract)
1 tsp Ground Cinnamon
150g Gluten Free Self Raising Flour

*Apologies for lack of images, my App crashed overtime I tried to upload more

Whisk all ingredients, except flour, together until light and fluffy.

Add flour and whisk again until well combined.

Place scoops of mixture onto a lined baking sheet.

Bake at 180ºC for 12mins.

Leave on tray to cool for a few minuted before moving as very soft.

Cool until easy to handle

Assembly

Top the base of a cookie with marshmallows (I used sliced giant ones) and suitable chocolate.
Repeat for number you are making.


Put back in oven for 1-2minutes, until chocolate is melted (but still holding it's shape) and marshmallows squishy.

Top with another cookie.

Leave to cool slightly or warm cookie will crumble.
Serve on a plate to grateful children...


Saturday, 3 June 2017

Black Forest Cookies

Ages ago I ordered some flavoured icing sugars from Sugar and Crumb, then put them away somewhere and forgot about them. I rediscovered them yesterday while I was looking for something else. 

I thought the black cherry flavour would pair perfectly with the slightly wrinkled cherries in the fridge. You could make them with unflavoured icing sugar too for a more subtle flavour.

100g Dairy and Soya Free Spread
85g Black Cherry Flavoured Icing Sugar (or unflavoured icing sugar)
15g Golden Syrup
20g Cocoa Powder
130g Gluten Free Self Raising Flour
20g Dark Chocolate Chips
120g Chopped Fresh Cherries (or a pack of dried sour cherries)
Put the spread, sugar and syrup in a bowl and whisk until pale and fluffy.

Whisk in the cocoa powder (I find this saves having to sieve it).

Add the rest of the ingredients and mix until well combined.
Place spoonfuls (or ice cream scoops) onto a tray lined with greaseproof paper.
Flatten slightly and bake for 12-15mins at 180ºC.
Leave for a couple of minutes on the tray to firm up before moving to a cooling rack.


Saturday, 4 February 2017

Chocolate Caramel Fingers

I'm not very good at doing nothing. After a weekend of being unwell and mostly neglecting my children, I wanted to make them a treat on the Monday. Still not feeling great, I didn't really want to bake. I got this idea, in a round about way, from a fellow judge from the Free From Food Awards. She'd tried a chocolate bar last week that had puffed amaranth in and said it tasted like a Blue Riband. 

I tried puffing some, slightly out of date, amaranth I had in the cupboard, in the same way I would pop corn. That didn't work. Then I found a box of gluten free crispbreads in the  snack box and thought of making chocolate wafer bars.
Sort of followed this for a toffee recipe but the 'cream' you use may affect the hardness at this temperature. I used about half this quantity, but it made far too much so I used the rest for making pecan toffees. 


Makes 10

200g Dairy & Soya Free Chocolate
10 Gluten Free Crispbreads (I used Amisa, but Le Pain de Fleurs have a large variety & would work too)
1/2 cup (100g) Dairy & Soya Free Margarine
1 cup (plus a bit more) (160g) Soft Light Brown Sugar
1/2 cup (150g) Golden Syrup
1 cup (225mls) Dairy & Soya Free Cream (or milk substitute)
1/2 tsp Vanilla Paste or extract

Make the toffee according to the above instructions.
Line a tin with foil and grease well.

Lay out wafers in the base of the tin.
Pour over toffee to form a thin layer, spread evenly to edges if necessary.
When set, but still slightly warm, cut crispbreads along centre to form two rows. Stack one on top of the other to form a double layer. 

Put another layer of greased foil over the top and press down with another tin to flatten and stick the layers together.

Cut into fingers with a sharp knife.
Coat each one in melted chocolate and leave to set on greaseproof paper.

Decorate by marking with a fork. 
Or drizzle with melted white dairy & soya free chocolate.
Boys were home in time to help with the decorating,
just didn't like waiting for chocolate to set!


Sunday, 2 October 2016

Beetroot & Sweet Potato Brownies (Hale & Hearty)

It's been one of those weekends. Poorly big little boy meant none of the things I needed to do got done on Saturday, then Sunday was spent catching up with myself. Still needed a proper pudding for dinner and a treat for packed lunches. Spotted a pack of Hale and Hearty Brownie mix (this does have a may contain milk warning) lurking on a shelf and decided that would save me some time. 

I've never been one for following recipes or instructions on packet mixes. Usually I'd add 100g of roughly chopped roasted hazelnuts and a cup of crumbled frozen raspberries, but as it's a nut free school, that would be no use today. I opted for the hidden veg option instead...

120g Dairy & Soya Free Spread
300g Puree Sweet Potato & Beetroot (I used 1 medium sweet potato and a pack of ready cooked beetroot)
400g Box Hale & Hearty Rich Chocolate Brownie Mix
Blueberries (or other berries) - I think I used about 150g

Prick the sweet potato with a fork. Microwave for 4 minutes (or until soft). Cut in half lengthways, scoop out the middle and put in a bowl.
Roughly chop the beetroot and add to the sweet potato (if you're using fresh beetroot, peel, chop, add a splash of water, cover and microwave until soft).

Blend or mash the vegetables.

Add the dairy and soya free spread and the pack of brownie mix. Beat with a wooden spoon until well combined.

Add half the blueberries (if using).

Pour the mixture into a lined brownie tin and top with remaining blueberries.

Bake at 175ºC for 25minutes until the blueberries just beginning to soften and the top feels spongy.

Leave to cool in the tin (or slowly cut off slithers to try if you're like me and Mini Monster and couldn't wait).

Cut into squares. Will freeze well.


Sunday, 1 March 2015

Chocolate Fudge Cake

I know I've been neglecting the site recently, so I thought I'd start with a quick adaptation to save me writing out the recipe in full. This vegan chocolate fudge cake recipe from Sainsbury's Magazine was posted on Twitter yesterday. It's already milk, egg and soya free so with only one more thing  (wheat) to change, I thought I'd give it a go.

I know from experience, that unlike biscuit recipes you can't just do a straight swap for wheat free flour in cake. rather than just upping the fluid, I decided to reduce the quantity of flour as well. I still can't just follow a recipe, so I reduced the sugar too…

As it was an experiment, and I've recently had a bad experience with a blondie recipe, I just made half quantity. This was enough to fill an 18cm cake tin, which I cut in half before filling and icing.

I didn't have any avocado either (well, I did, but it's been lurking in the back of the fridge for so long, it really wasn't usable!) so haven't tried the icing. Mine was made with an apple and apricot fruit pot and the cake filled with apricot fruit spread. 

Amended ingredients:

1 small banana, or half a large one (mashed well) - mine was 47g
4 1/2 tbsp (75mls) Milk Substitute
2 1/2 tbsp (45mls) Vegetable Oil
120g Sugar (I still found this a bit sweet, despite using less than the original, would probably try with 100g next time)
1 tsp Vanilla Paste (or extract)
1 tsp Vinegar (I increased this as acid helps the rise in gluten  and egg free cakes)
25g Cocoa Powder (mixed with 75mls water)
175g Wheat Free Self Raising Flour
1/2 tbsp Baking Powder
35mls Maple Syrup

For method, please follow link

As it is a wetter mix, please adjust the cooking time by about 5 mins, or until it feels firm in the middle.


Monday, 28 April 2014

Chocolate Fig Brownies

Healthy Food Guide Magazine published a selection of gluten free goodies in the February 2014 issue. They all looked tasty, but as the only nut free one, this is packed lunch friendly. They looked squishy and sticky, like any good brownie should be (I always find GF brownies disappointingly cakey) and looked easy to adapt. So, here goes...

125g Dairy and Soya Free Spread (Pure/Vitalite)
40g Cocoa
140g Light Muscovado Sugar (or caster sugar)
125g Dried Figs (about 7 figs), chopped very finely
120mls Milk Substitute
125g Wheat Free Self Raising Flour
1/2 tspn Baking Powder
(Icing Sugar to dust - optional)

Put chopped figs, spread, sugar and cocoa in a bowl and microwave until spread melted (or stir in a pan over a gentle heat). Sorry, no pictures of this bit, only decided to post it half way through making...

Stir well to form a thick paste.
Add the milk substitute and stir again.
Put the flour and baking powder in a bowl.

Pour on the chocolate mixture.
Fold in until well combined.
Pour into a greased lined tray (about 16x28cm).
Smooth out evenly.
Bake at 180ºC for 20-25minutes until slightly risen and firm to the touch.
Cool in the tin (if you can resist the chocolatey smell wafting through the kitchen).
Cut into 12-18 brownies and lightly dust with icing sugar to serve.

Try adding chocolate chips for a more decadent brownie.

Monday, 31 March 2014

Tea cakes (Chocolate marshmallow ones, not bread)

Mulberry Marshmallow Filled Teacakes
Since I discovered how easy it was to make marshmallows I've had a craving for teacakes. I don't know how many times I've looked at the moulds on Lakeland's website and dithered over whether to order 1 (not enough for more than one each...) or 2 (but then realised they look too big for more than 1 anyway…). Then I looked online and realised hemispherical moulds came in many different sizes! I found one with 15 domes of about 3.5-4cm across and ordered it in time for 7 year olds birthday. Just. 

I hadn't planned to post this recipe yet as it was just an experiment, so I don't really have many pictures, but so many people on Twitter got excited I felt need to post it sooner. So here goes. It's another one of those recipes that looks more complicated then it is. Honest.

First I realised I was almost out of chocolate and needed most of it for the requested chocolate birthday cake (will also post recipe eventually, but don't feel you need to go for the same level of decoration!). 

'Naked' dragon during assembly
Ferno the Fire Dragon
Hunted around and discovered a Moo Free chocolate santa lurking at the back of the cupboard. Just don't tell the kids I melted it - I'm sure that by about June Mini Monster will suddenly remember he had one that he hadn't eaten!

My next mistake was putting the rest of the bowl of melted chocolate in the kitchen, ready to cover the bases when all assembled. Helpful husband ate it while doing the washing up, not realising I hadn't finished! Fortunately I found half a pack of chocolate buttons lurking in the bottom of the snack box…

I'd read somewhere about mixing a little coconut oil with the melted chocolate to give a crisp shiny finish, but I still got a bloom on my chocolate. Next time I'll skip the coconut oil (found coconut flavour overpowering) and try to temper the chocolate properly. Or not. Who cares if the chocolate is a little swirly? 

These seem complicated, but can be made in lots of little stages over a few days if necessary.

Biscuits (these can be made in advance)

60g Dairy and Soya Free Spread (Pure or Vitalite)
40g Caster Sugar
2tbsp (30mls) Oat Cream (or rice/almond cream)
1/2tsp Vanilla Paste (or extract)
145g Plain Flour or Wheat Free Plain Flour (may need a little extra if not using almonds)
25g Ground Almonds (optional)
1/4tspn Baking Powder

Put spread, sugar, vanilla and cream in a bowl and whisk together.

Add flour, baking powder and ground almonds, if using.

Mix together with a spatula until it comes together.

Add a little more flour, if necessary and kneed lightly.

Roll out to 2-3mm thick. 

Cut into circles slightly smaller than the diameter of your mould.

Bake for 12-15mins at 170ºC or until crisp.

Set aside (this amount of mix is much more than needed for the teacakes, so cut the rest of the mix into any other shape you want and bake. Or wrap in cling film and leave in the fridge for a few days until you need more biscuits).

Chocolate

100g melted dairy and soya free chocolate (I used a mixture of Moo Free and Mortimer's for a slightly darker chocolate)

Brush the inside of your mould with melted chocolate (if you don't have a brush, just do what I did and use the back of a teaspoon, you just won't get such an even thickness).

If you're in a hurry, pop the mould in the freezer to set.

In the meantime, dip one side of the biscuits in melted chocolate and set them aside until ready.

Brush another layer of chocolate into the mould and leave to set again (I did this the day before I needed them).

Marshmallow (original recipe)

Vanilla and Mulberry Marshmallows
3 sheets leaf gelatine (I haven't had a go with vegetarian gelatine yet, but I'm sure it's possible too)
110g caster sugar
40g golden syrup
30mls water or fruit juice (I used about 60mls Mulberry juice reduced down to concentrate the flavour)
1/2 tsp vanilla paste (or extract)

Put sugar and syrup into a pan and just cover with cold water.

Heat gently until most of the sugar dissolved (do not allow it to boil at this stage) - swill the pan rather than stirring.

Remove from heat and put on a tight fitting lid for 10 minutes (the steam helps dissolve any sugar crystals remaining on the sides of the pan - if you leave these it will affect the caramelisation).

Return to heat and remove the lid.

Soak gelatine in cold water and set aside for 10 minutes.

Drain water off the gelatine and add the 30mls of water or fruit juice.

Microwave for 10-20 seconds to dissolve the gelatine (if you don't have a microwave, add boiling water, or hot fruit juice).

Bring to the boil and boil until you get to 130ºC - if you don't have a sugar thermometer, this is the 'hard ball' stage (fill a glass with cold water. Once the syrup has boiled rapidly and is starting to change colour, put a few drops into the water. If it breaks up it's not ready, if it goes into a long string it's not ready, if it forms a ball, but it's still soft when you squash it it's not ready, when if it forms a ball that is hard, you are there!)

Slowly pour the syrup into the gelatine mix, whisking constantly.
Continue to whisk until thick and pale and producing threads like chewing gum.


Assembly

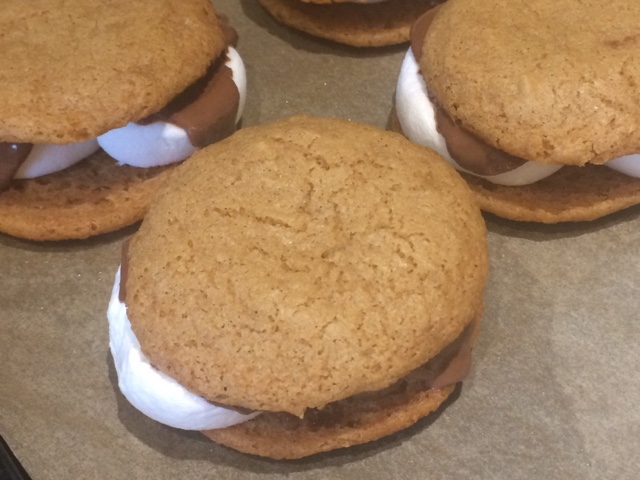
Spoon marshmallow mix into chocolate shells - probably needs to be about 2/3 full (don't overfill or there will be no room for your biscuits - I pushed my biscuits down forgetting that silicon moulds are soft and shattered the tops of most of them!).

Pour the rest of you marshmallow mixture into an oiled tray to set. Cut into shapes and toss in a mixture of icing sugar and cornflour.

Top with the chocolate side of one of you biscuits.
Spread melted chocolate over the base to seal everything in (don't worry if you go over the edges, they can easily be trimmed).

Leave somewhere cool to set.

Turn out carefully - don't push bottom of mould! I stretched the mould around the edges to loosen it.

Enjoy!